
Rectified white body tiles,
jointless walls
We create tiles and cut the edges. These “sharp-edge” tiles can be laid without joints, for perfectly smooth, continuous surfaces, with the joints barely noticeable. In addition to the aesthetic advantages, these tiles prevent dirt from gathering and are thus easy to clean.
We rectify the tiles with a slightly diagonal cut,
allowing for flush laying:

Laying without cracks makes it easier for the grout to penetrate
Laying, grouting and maintenance
Wall tiles
Follow the simple rules below to guarantee perfect tiling results:
check the walls that are going to be tiled are flat;
mix the tiles during tiling by taking them from several boxes;
handle the tiles with care before and during tiling;
Applying the adhesive
Use adhesives that comply with the technical standards (UNI EN 12004 for adhesives)
Fap Ceramiche recommends using only class C2 adhesives according to the EN 12004 European Standard. Use white adhesives for slipresistant ceramic tiles. For top-class results, add an elasticator, taking care to follow the manufacturer’s instructions to the letter.
Apply the adhesive both on the wall to be tiled and on the underside of the tile (double application).
The adhesive should be applied on the wall with a notched trowel that has a minimum tooth slope of 10 mm depending on the flatness of the substrate. In order to make a straight groove that runs parallel to the short side of the tile and facilitates the escape of air, the spreading motion should be linear and not circular.
Use a notched trowel with at least a 4 mm-tooth size to spread the adhesive on the back of the tile. The grooves must be straight (not circular) and parallel to those made on the wall.
The thickness of the adhesive can be adjusted using the notched trowel.
Attention: before applying the adhesive, make sure there is no ceramic
Laying the tile
When laying the tile, it is important that the grooves of the adhesive on the wall and those on the back of the tile are aligned parallel to each other to facilitate the escape of air. Therefore, do not lay the tiles with crossed grooves.
To create a full bed of adhesive, tap the tile into its seat while applying the appropriate pressure. In order to attain maximum tile/adhesive/wall contact, it is recommended to start tapping from the centre of the tile and move outwards in a linear manner, covering all directions.
If there is any seepage of adhesive from the joints after tapping, make sure to clean it using the appropriate equipment.
Important
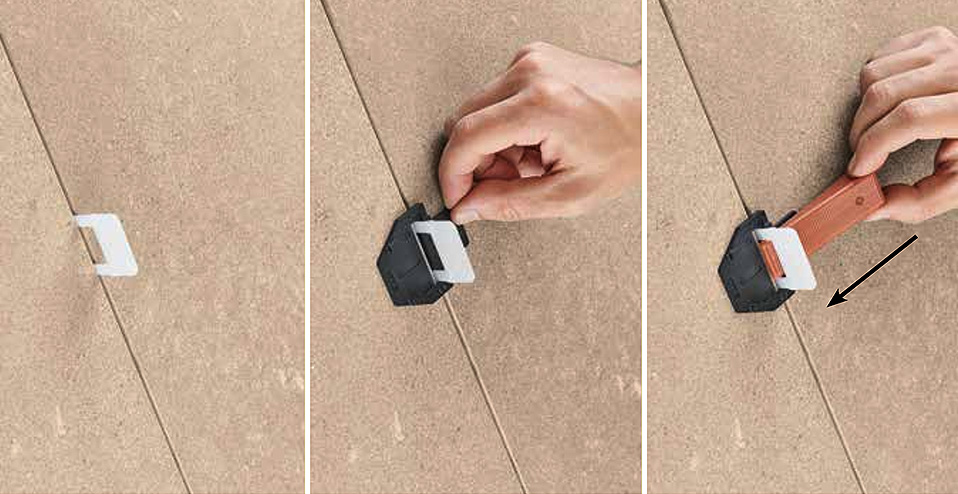
Fap’s rectified wall tiles are designed and manufactured to allow the tiles to be laid side by side without gaps. This gives the best final appearance (seamless walls) and performance (the tiles do not collect dirt because there are no joints). It is recommended to place anti-skid and scratch-proof levelling mats between the wedge and tile to avoid possible chips or scratches on the tile surface. Place the 80x160 size tiles with levelling spacers, and ensure the joint size is between 0.5 to 2.0 mm.
Grouting
Joints must be cleaned before grouting.
Use matching grouts.
Cleaning
It is important to thoroughly clean the entire tiled surface, including the tiles, grout lines, expansion joints and any other profiles.
The cleaning is deemed successful when all traces of the laying materials have been completely removed.
The cleaning process should be done only after the joint sealant has fully dried, using a cleaning agent appropriate for the sealant’s properties.
Use cleaning tools that are perfectly clean themselves. Always rinse off surfaces. Use clean water alone if the surface is washed frequently.
Gres porcellanato
Follow the simple rules below to guarantee perfect tiling results:
check that the floor slab where the tiles are to be laid is flat;
mix the tiles during tiling by taking them from several boxes;
handle the tiles with care before and during tiling;
Applying the adhesive
Apply the glue both on the surface to be tiled and on the underside of the tile (double application).
The adhesive should be applied on the surface to be tiled with a notched trowel that has a minimum tooth slope of 10 mm depending on the flatness of the substrate. In order to make a straight groove that runs parallel to the short side of the tile and facilitates the escape of air, the spreading motion should be linear and not circular.
Use a notched trowel with at least a 4 mm-tooth size to spread the adhesive on the back of the tile. The grooves must be straight (not circular) and parallel to those made on the surface to be tiled.
The thickness of the adhesive can be adjusted using the notched trowel.
Attention: before applying the adhesive, make sure there is no ceramic or magnesium dust (engobe) on the back of the tiles. If necessary, clean using a sponge soaked in a solution of acid detergent and water.
Laying the tile
When laying the tile, it is important that the grooves of the adhesive on the surface to be tiled and those on the back of the tile are aligned parallel to each other to facilitate the escape of air. Therefore, do not lay the tiles with crossed grooves.
To create a full bed of adhesive, tap the tile into its seat while applying the appropriate pressure. In order to attain maximum contact between the tile, adhesive and surface to be tiled, it is recommended to start tapping from the centre of the tile and move outwards in a linear manner, covering all directions.
If there is any seepage of adhesive from the joints after tapping, make sure to clean it using the appropriate equipment.
Important
Fap rectified floor tiles must be laid with a 2-3 mm joint between them. For the laying outdoors we recommend a joint of 3 mm. For floors with a lengthwise tiling layout, maximum 1/3 offset between panels. The hexagons will have to be laid with a 3 to 5 mm joint between tiles.
Grouting
Joints must be cleaned before grouting.
Use matching grouts.
Glossy porcelain stoneware
Glossy porcelain stoneware is created by means of a special polishing process that enhances the smooth texture of the surface of the tiles, thus achieving a sophisticated look in which vibrant reflections create a uniquely attractive effect. The polishing process used for all the polished and lapped products on the market involves removing a tiny part of the material and sometimes opening up a number of micro-pores on the surface, which makes the products more vulnerable to staining. We recommend using grout in a shade similar to that of the tile, in order to reduce contrast. During the laying process, materials should not be marked on the upward facing side with pencils or permanent markers.
Cleaning
It is important to thoroughly clean the entire tiled surface, including the tiles, grout lines, expansion joints and any other profiles.
The cleaning is deemed successful when all traces of the laying materials have been completely removed.
The cleaning process should be done only after the joint sealant has fully dried, using a cleaning agent appropriate for the sealant’s properties.
A thorough cleaning is achieved by using a mechanical monobrush and liquid vacuum cleaner, followed by a final water rinse.
When cement-based grouts are used, the tiler should follow the instructions for cleaning. Follow the manufacturer’s instructions if epoxy grouts are used.
Cleaning to be performed by the tile layer.
Initial cleaning: about 10-20 minutes after grouting grout will lose its plasticity and become opaque: any excess sealant should then be removed using a clean, damp sponge. The tiles must then be wiped clean using a dry cloth or felt.
Final cleaning: after 36/48 hours both the tiles and the joints will have dried completely: the surface must then be washed using a buffered acid solution. The tiles must then be rinsed using plenty of clean water, which must then be removed using a liquid vacuum.
Extremely important: It is essential that the tile layer cleans the tiles exactly as prescribed so that the flooring will subsequently be easy to clean. The care taken with both the initial and final cleaning processes (in particular the complete removal of grout residuals) will affect the subsequent ease of maintenance of the flooring. The best manufacturers of joint-grouts and adhesives recommend this procedure for all flooring in porcelain stoneware. If these recommendations are not observed or if water is used which is not perfectly clean, it could lead to the formation of a hardly perceivable film of grout or building site dust which is extremely absorbent and captures any dust in the atmosphere and can make the floor look eternally dirty. In this case Fap Ceramiche declines any responsibility.
Ordinary cleaning
Frequency: as usual.
Recommendations:
always use cleaning tools which are perfectly clean;
always rinse the floor;
do not walk on the floor when wet;
clean water without detergent may be used for frequent washing or specific detergents to remove dirt of stains that are not waxen or filmy. We advise not to use detergents with the indication “it is not necessary to rinse after use”.